Categories
Maker Taiwan

Make the most of solar power

It didn’t take the arrival of a horrendous electricity bill to the Taipei Hackerspace to start thinking about reducing my electricity footprint. In the last half a year there were two solar power projects on Kickstarter that I signed up for: the Solar Pocket Factory (SPF), and the Foldable USB Solar Cell (FUSC). Generally there’s a lot of sunshine here in Taiwan (when we don’t have a typhoon), and even if I cannot power my laptops from it, could certainly try to power my smartphone…

It turned out that I needed both Kickstarter projects to make one good device.

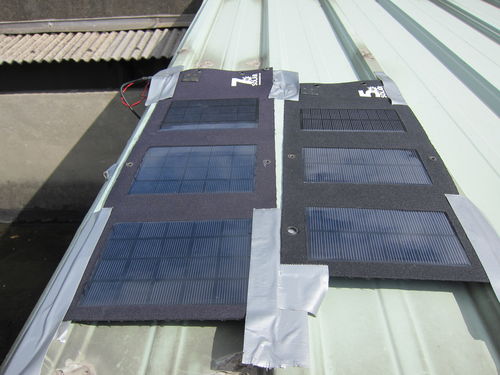
The Foldable USB Solar Cell looks awesome and not bad at 7W and 5W (the two pieces I have). The voltage output doesn’t seem to be very stable, or has strange behaviour as it doesn’t charge my attached phone when there’s too much direct sunshine. Thus I cannot really use this directly with devices.

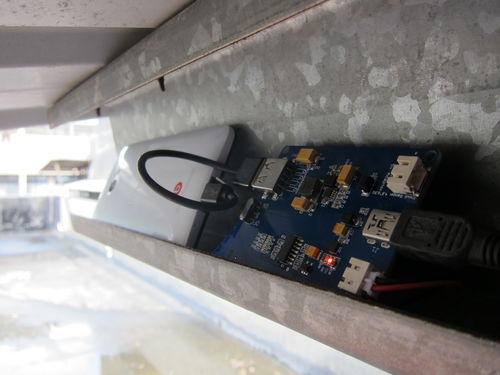
The tiny solar panels in the Solar Pocket Factory are very fragile and I couldn’t really make them into an actual working cell yet. On the other hand, it came with a 2000mAh battery and a circuit called Li-Po Rider Pro, by Seeed Studio. This circuit us solar cell or USB input to charge a battery , plus have a good output circuit to charge a USB device either from the battery when there’s no sunshine or from the input when there is.

Putting together the Foldable USB Solar Cell and the Li-Po Rider Pro, we have something that kicks arse indeed! Since I only have one circuit and Seeed doesn’t seem to sell it separately, I thought I could improve on things if I use both solar

USB adapter for parallel panels

The easiest idea I could come up with is creating a USB adapter to connect the panels in parallel (thus practically summing them up as current sources).

USB connector wiring, from the Tech Support Guy forums

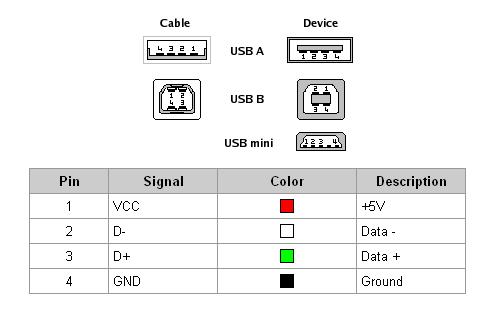
This plan needs two male USB A connectors (the “cable” type on the picture) to plug into the panels, and one female USB A (the “device” type) to provide the single output. Then female VCC pin is wired to both male VCC pins, and the GND pin similarly to the GND pins. The D-/D+ pins are not in use in this case.

Parts on the working desk
Part for the solar panel connector. One female and two male

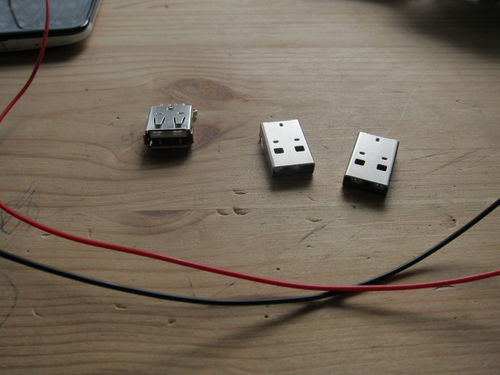
The connectors came in as $0.40 each, the wire I don’t remember but probably a few cents. I fortunately had both black and red to use with the GND and VCC. Things are better colour coded.

Soldering together the middle two pins, and hook the ones on the side with wires (here the black wire for the Ground line)

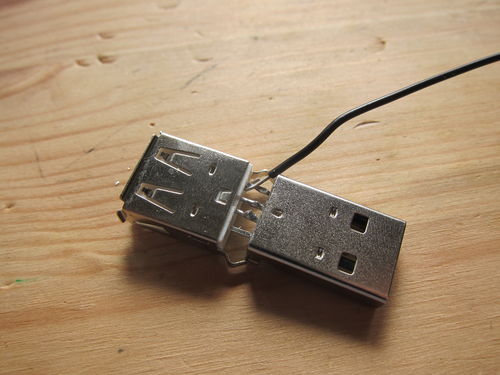
First the middle two pins of a male and a female connector is soldered together, just to provide mechanical support. The end of the cable is stripped and hooked around the touching pins (the GND pins on this picture). The two pins + wire is then soldered together, with enough solder to stay, but not that much that the other pins could touch.

Finished soldering, a bit too much solder, but at least it holds

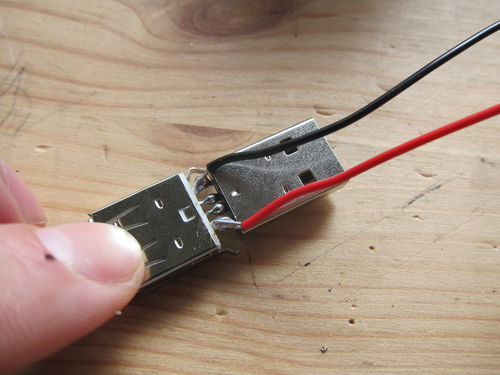
Did the same thing for the VCC pins + red wire. Finally added some more solder to the central pins. It was pretty stable like this, though I guess it would be better to have some sort of external housing for it or another way to increase the mechanical rigidity of the connection.

The extension cord to the extra male connector

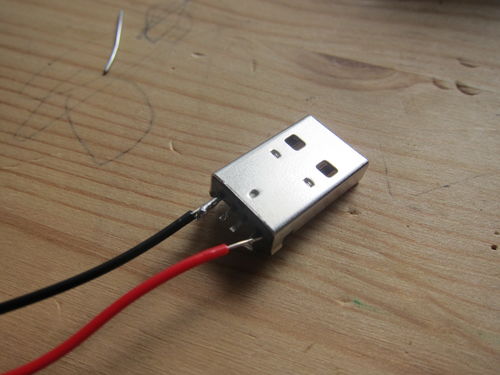
Finally the other connector is soldered, making sure that the right pins are connected (the same as the other male USB). The connectors are then wrapped in a bit of duck tape for some rough insulation. These parts will be outside, both in sun and rain, nothing much can break, but better not test whether I’m right about this particular point…

Cover and plug into the secondary solar panel

Plugged into the secondary (5W) solar panel, and into the primary (7W) one as well. Duck taped everything down onto the roof well enough that they are not blown away too easily (though I’d better check on them in a bit, the wind is howling just now outside).

Primary solar panel with the adaptors

As an aside, the duck tape doesn’t seem to like the sunshine. It sticks its sticky parts on everything, that part doesn’t seem to spell fun for the future.

Ready to charge

When everything is connected, the panels will get pretty good sunshine for the bigger part of the day. I don’t think they reach max capacity, because the angle is never ideal, but from the practical point of view, they get enough sunshine to max out the attached 2000mAh battery between device charges.

Hold the panels down, plenty on sunshine (at least this afternoon

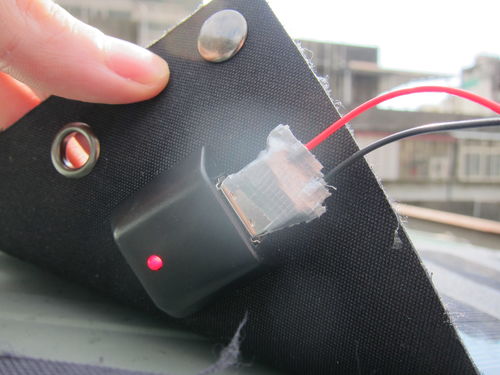
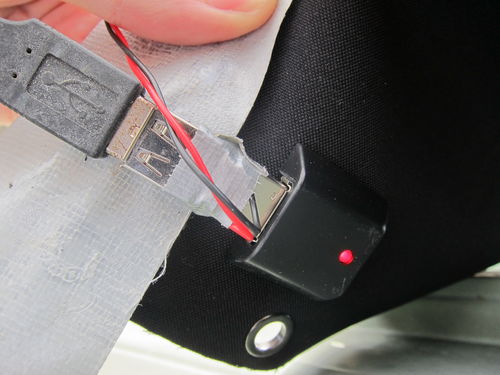
The Li-Po Rider Pro circuit is under the roof, so it doesn’t get any rain (at least I hope!), and has a little ledge to charge a phone safely as well.

solar8
Charging circuit and filling up my phone

Since all the devices were pretty much full when I checked in the Hackerspace after I finished this setup, the test whether combination of the two solar panels does indeed increase the power is not foolproof. Otherwise I would have charged a device from a low battery level to a bit higher with one panel, then later switch to two panels and see the different slope of the batter charge versus time. Normally at high charge levels (90%+) the slope is varied by the charging circuit (to preserve the lithium battery’s life), thus that level is not really good to test the difference between the single / dual panel situations.

One thing does suggest, though that the plan worked. Before this modification, charging a phone discharged the Li-Po Rider Pro’s own battery (there’s a touch switch on the circuit to get an approximate charge level, indicated by the lighting up of 0 to 4 LEDs on an LED bar), even in full sunshine. This time it seems that both the phone and the storage battery is charged up, indicating larger incoming power than before. I will check it again next time, though (the Nexus 7 tablet we have will be great for that, it has much larger internal battery than my HTC Butterfly phone)

Possible improvements

There are a few things I could improve on the setup, focusing on usability.

I hope to get a longer USB cable to reach from the roof to inside the Hackerspace, and set up a charging station within the room. This way people don’t have to keep their devices out of reach while charging, and there’s no chance of being ruined by a sudden rain.

I hope to get a larger capacity Li-Po battery. 5-10.000mAh could be good, then it would likely have enough power all the time to keep charging people’s devices, and not standing idle being full when not charging something, while easily emptied by a single device.

The roof also has plenty of more space, so getting a bunch of other panels, combined with the first two upgrades, would make it really beneficial. These foldable panels would be better portable, and keeping them in one place feels a sort of waste.

Ultimately it would be awesome if I could have a purely solar-powered phone. Because it would mean some money saved, but also, and mostly, because I can.

Categories
Startups Taiwan

First sale of an ebook I helped to publish

Recently I was helping a friend to publish the ebook version of his paper book, called How to Start a Business in Taiwan. About 50% the reason was that I like the book and hoped to get into more people’s hands, and 50% I wanted to see what is it like getting an ebook out the door and bought by people.

Just a while ago, it had its first sale (hopefully the first of many:). *champagne!*

How to Start a Business in Taiwan on Kindle

I guess it is a very humbling experience that it took some 5 days of promotion effort to make that sale. That is even before I count how much time I have spent converting the Word doc into Markdown, and tweak the looks. The technical details to that I have written up in a guest blog post on the books website.

The marketing side is still under development, and the numbers are too low to draw a lot of conclusions from. The most surprising thing to me is how many people actually click the “buy this book” link and then they don’t follow through. Then also the half a dozen people who I followed up on earlier discussion to tell them about the ebook version, they say “ah, it’s awesome, I’ll go get it, I’ve been waiting for it” – then nothing happens.

Of course, there can be a lot of reasons for this, here are some of my guesses:

  • The website UX does not work well for them (ie. the are put off by the process)
  • People don’t know/like Leanpub
  • People are lazy
  • The price is too high
  • The sales copy is bad, so people don’t think a business book can worth that much for them (ie. price is perceived to be too high)
  • Spreading the word at the wrong places, thus wrong audience

… and probably a hundred other reason that I wouldn’t think of – or 171, since the book’s page had that many unique visitors in the last few days who left empty handed. I wonder what would be a natural next step to improve on this conversion rate.

It was a very fun thing to do, though, and got me psyched up to get my two idea-stage books going. And about ebook publishing in general, will definitely try to get more people onboard who have writing tendencies.

Also, this invaluable learning, as I’m setting up my startup now, a good reminder that people will not easily/often buy into my “awesome” idea, will have to work cleverer on that. Rejection therapy in its earnest.

(Disclaimer: I have no financial interest in the book,  ie. I won’t get any of the sales, which makes things even nicer. I received one original paper copy last spring to review and edit.)

Categories
Maker Taiwan

Taiwan’s Open Hardware movement gets a boost

I sure felt different yesterday morning waiting for my turn to give my 30 minutes talk, but in retrospect I’m really glad to have been invited to the Boost Open Source Hardware Movement event, organized by the CTIMES magazine over here in Taiwan. It was the second time try, after Typhoon Soulik cancelled the original event.

CTIMES personnel introducing the Boost Open Source Hardware Movement event
Kicking off the event early Saturday morning

There were 8 speakers scheduled from different companies and background: RS Components, Via, Broadcom, Motoduino, TMI Holding…. and me from Taipei Hackerspace. First I was wondering how do I fit in there, and maybe my talk *was* out of place a bit. Most talks were in Chinese so I could grasp only basic stuff from them, although the slides helped – most people made slides following the “slides are my notes” style, which is not my style, but was welcome this time. It was also great to see seasoned speakers like Richard from Via, and Lucas from TMI giving fun (and informative!) talks.

I did feel I’m in the right company, though. Open Source Hardware is becoming more and more of my focus – or maybe I’m just realizing it now that what I do is called such. Part of the audience were industry professionals and part enthusiastic hobbyists & students, and I had some great chat in the breaks with both kind of people.

I heard about the National Science Fair here (what? I got to check that out!), and how much interesting work people do with interactive hardware and elementary/high school kids. There is waaaay more going on that I can imagine, and there’s a lot more potential to tap into.

Had a chance to gather some industry experience too. Naren from Broadcom, who was responsible for getting Raspberry Pi into production was telling the story how they were expecting only 10,000 orders altogether and got 350,000 on the first day (sold 1.8 million to date), so they had to scramble an entire new supply chain. Thought that came to me was that maybe that’s one of the biggest value of  Kickstarter/Indiegogo is to be able to get an order of magnitude estimate of the demand.

Also heard about Via’s experience in pursuing new design and materials with their APC platform (such as using paper for housing), and interacting with their community. Heard a lot from RS Components how they are building tools for their community, and building the community itself. The demo was fought with technical difficulties (first rule of presenting is not to assume a working/fast internet connection), but it was inspiring nonetheless, and gave me some big (and difficult) ideas for my project: have to see if there’s any good community for scientific/laboratory electronics and hardware building, and if there isn’t then build one.

View of the room during the break time
Break time between the talks, everyone’s scrambling for chat and cakes

One of my favorite part in these events though to meet friends’ friends. This time was no exception, even if there was too little time to talk, I left with quite a few people in mind who I will need to contact soon, because they are doing something awesome and connected to my area of interest, either in hardware or in startups. This is one reason I’m trying to be really generous with my time and making introductions between people who I recon would hit it off well: I was the recepient of that so many times that I got to give back too.

My talk

I was scheduled in the middle of the afternoon just before tea break, and I was one of two people who used English for their talk (out of the 8 speakers). I was more nervous

I’ve uploaded the slides used for the talk in advance as well, so now it’s all out in the open.

My favorite part writing this talk was probably the attempt to summarize the philosophy and values of the maker movement, in a way that would inspire others. Some bits:

  • Don’t accept crappy – everything can be changed and improved upon.
  • Aim for collaborative creation. Celebrate the weird. Don’t mock.
  • Do and then share the results for everyone to learn from it.
  • For things to happen, you have to show up. Don’t wait for someone else to start, build up and inner motivation
  • Everyone’s values are different, a ‘space is often a different canvas for everyone.

So far the feedback I got about the talk is that I should have mentioned the projects people were working on in the ‘space, and upcoming events. That would have made a better ending for sure, and I had an extra 5 minutes or so to do that. Definitely going to emphasize the practical aspect next time.

Another thing I noticed listening to (a bit of) the video is that I need to use much less “ehm” and “ahm”… I certainly don’t remember using any, and consciously trying to avoid it in my talks in the recent years, I guess I need to listen more carefully (and prepare better).

Any more suggestions? What else wasn’t good? Bring it on, I want to become better at this.

More about the Taipei Hackerspace is on the mailing list, which is open for everyone to sign up, ask questions, show their projects, and hear more about what’s up.

Categories
Programming Taiwan

Barometric recording of Typhoon Soulik

It all started a few weeks ago with Sparkfun having “20%-off” day, when I got myself (among other things) a BMP085 barometric pressure sensor. When it arrived, I have soldered some pins on it, and set it up with an Arduino Nano, to have the readings off it easily.

View of the circuit
BMP085 barometric pressure sensor breakout board from Sparkfun

Originally all I wanted is just some laid back pressure recording, so maybe I can use that to predict the weather a bit. “Pressure falls: bad weather comes, pressure rises: things will clear up”. I was recording for about a week, and nothing really noteworthy came out of that.

Then it was the news, that the year’s first typhoon is on the way to Taiwan, and it was supposed to be a big one. Obvious that I will try to record the barometric pressure pattern of its passing, but wanted to make it more interesting and informative. More visual than just the timeseries plot of pressures.

The Japanese Meteorological Agency (JMA) is a good place to watch for information about typhoons. They list path prediction, typhoon properties like strength, wind speeds, and central pressure, have satellite imagery. Putting these together, two days before the typhoon arrived, I set up a script to download the satellite imagery as it became available.

Satellite picture of Typhoon Soulik and location of Taiwan on 2013-07-12 morning
The morning before the typhoon arrived

The JMA publishes usually 2 satellite images in an hour for our North Western Quadrant (at :00 and :30), one of them covers the whole area, the other covers just the top 80% or so, leaving a dark band on the bottom. Nevertheless, matching up the pressure reading with the satellite pictures would be a good little project for this time.

Friday came, the government gave the afternoon off, though it turned out no landfall happened till everyone supposed to be off anyways, just a bit of on-and-off rain. People stocked up on convenience store food (I now have a good supply of instant noodles:) and water, taped over their glass windows, take in their plants and BBQ equipment from outside – well, those who have planned.

Around 10pm the big rain has arrived, here’s a video of how it looked from my window. Went to sleep later, and got woken up around 3:30am by the rain having changed into pretty darn big wind. Here’s another video of the violent part of the typhoon that time in the morning, that doesn’t even really do it justice. The houses around here are pretty tall, and I wonder if they have protected from the wind, or been artificial canyons channeling it. Some things got broken, though not as much as I expected – which is a very good thing.

In the meantime by the power of the Internet I have checked out the pressure reading, how is it going a few miles away in the Taipei Hackerspace, where I have left the barometric pressure sensor (the geolocation is 25.052993,121.516981)

Here’s the entire recording of the approximately 2 days of typhoon. It was pretty okay weather in the start and end of the plot.

Plot of pressure readings
Pressure reading during the passing of Typhoon Soulik, recorded at the Taipei Hackerspace

The readings have been corrected to sea level (from about 20m height, where the Taipei Hackerspace is), should be good within 1hPa or less.

The the pressure was indeed dropping like a rock, and the dip on the graph coincided with the most violent wind that woke me up. According the JMA, the central area of the typhoon had pressures down to 950hPa, which means that core must have passed pretty close to here, having readings below 958hPa, though probably not directly, as it didn’t stay down there for long.

I made a video syncing up the pressure reading and the satellite picture. The red dot on the video marks the recording location. (Watching it in full screen and HD makes it clearer.)

I would wonder what was the flat part in the readings while the typhoon was leaving. Maybe sign of changing direction, by the look of it.

Either way, this was fun to do, and I am glad that only a few people got hurt here, much fewer then even during the less powerful typhoons. Maybe getting people scared a little (like with this “super typhoon” stuff that went on) helps them keep safe? Just don’t use it too often.

Extra material

I put almost all material used here into a gist: the satellite imagery download script, the plotting, the movie frame generation, the movie generation script, and the complete barometric recording. Because this last part is pretty big (5Mb), Github truncated the rest of the scripts. I guess it’s okay to check check it out. Will add the Arduino sketch to read the sensor and the logging script later.

The satellite imagery weighs about 60Mb, so don’t put it online, but if anyone wants them, let me know.

Keep safe!

Categories
Programming Taiwan

Hack+Taiwan

The World Creativity and Innovation week (WCIW) goes on every year April 15-21 (set to coincide with Leonardo da Vinci’s birthday). This year we were making some events in Taiwan as well, first about creativity: Create @ Public, and another one a week later for innovation: Hack+Taiwan, a hackathon.

Of the two events, this one was the trickier to do. For Create@Public, all I had to do is pack a lot of stationery and start making stuff myself. For a hackathon, there’s much more preparation to do. Fortunately, I had some great mentors to get things going, James of Startup Digest Taipei and Volker from Yushan Ventures. They have a lot of experience pulling off great events, and I was glad to hear their advice. I was surprised that in less than 2 weeks something like this could be put together, even under not totally favorable circumstances.

First had to find a place to host it, and preferably with zero budget. Looking at who do I know, ended up at appWorks, a startup accelerator, whose founder, Jamie is indeed a hacker at heart, so wasn’t actually that bad to convince him to give us some space on a weekend day. Even got one of their teams working there, Fandora, to help us.

That’s a good first step, now have to get some people to participate. I set up the Hack+Taiwan blog (on Octopress, just trying something new, that was an “interesting” experience as well), the event, a sign up sheet and started to spread the word. It all went well, until one week before the event it turned out that the Open Source Developers’ Conference has a hackathon pretty much the same day & time as I planned. That freaked me out a little, and after asking around, I got many different advice: cancel so not to compete with them, cancel to take a rest, and give it my best try nonetheless. Of course the craziest option won, so started to spread the word even more, trying to invite mentors, getting catering, figuring out how the day should work and so on.

Let’s get to it

Since people don’t like to fill out sign up sheets, and Facebook event “join” is so easy, I had absolutely no idea how many people will come. It was just winging it, I knew I’ll be there and a couple of people who were helping me, but that’s all so far.

Hack+Taiwan logo posted on the day
Hack+Taiwan logo

I ordered breakfast for 30 (from Magic Bagels), and let’s see what happens. Around 9am, the advertised start time, people started to come, first a couple, then some more, and around 10 o’clock there were almost a dozen people. That’s not bad at all, even considering that a third of that was mentors and other organizers, but they took part just the same. Since most people didn’t bring any ideas (some even didn’t bring a laptop, now that I don’t understand), had to get them to come up with some stuff on the spot. It took a little pushing, some ideas were so specific and pretty much the same they are working on their normal time, but fortunately there were some interesting ones. In about half an hour we had 3 teams working on three completely different. In the afternoon there were even more people who dropped by for some time, and got another project working.

Arduino hacking
Making an Arduino piano

The projects we had:

  • Mobile reminder app + website
  • Android programming (the team had to leave before demo time)
  • Visualization of the Taiwanese power grid for monitoring and supervision
  • Arduino piano
These are all very different, and fortunately all was pushing the participants a little bit. The first team was mostly mentors, or from different startups working at appWorks, and they haven’t worked together before. It’s a good way to improve collaboration. The second team wanted to try Android out, maybe I should have talked to them more (having done one app at my time), otherwise they looked pretty lost for most of the time, hope they will carry on. The third team I gave some advice, but not sure if that actually took them on a sidetrack, it should be a very useful project if done, and has a lot of potential apparently for the local utilities companies. The last one, a one person team, was making some really cool stuff in a very short time and even with broken and sparse equipment. Not sure if she was really challenged by the task, it looked quite effortless.

At 5:30pm we had a demo time, everyone showing off what they made, people switched to speaking Chinese since I was the only foreigner around, so I got to train a little better next time to be able to follow tings. I could see their demos, though, and it’s so impressive how far people got in pretty much 6 and half hours….

Here’s the photo album of what went down. I’ve also taken a timelapse image series of the event, been planning to make a video of it….and then successfully overwritten all the photos with a bad command of ffmpeg. That’s my way.

Lessons learned

  • Coming up with ideas is hard
  • It is still possible to come up with ideas. Look for issues that kept bugging you for a while, and do something about those
  • Everyone gets out different thing from these events
  • Don’t force things, everything will work out anyway
  • Don’t have to overplan, before one establishes their name in the community as good organizer, it is usually more likely to overestimate how many people will come to an event
  • Everyone loves bagels and cake (okay, that’s not new lesson)
  • Unless there are enough people, don’t have to focus the topic of a hackathon, see whatever people come up with. More difficult brainstorming, but better chances of success
  • Don’t drink too much coffee – I couldn’t get much done from the shakes

I really liked the feedback I had from the participants, and also from other people: there were some who were just working in the background on their own stuff, and when we finished they came and asked what was it, because they’d like to take part next time. That’s the spirit! And we might just do that, for example at the end of the summer. In the meantime, I will try to focus on earning back my own hacker badge.