Even before the 4-Hour Work Week made me more serious about this, I really enjoyed automating tasks, that benefit from not needing to remember to do, or would be troublesome to do otherwise. This frees up a lot of time, keeps a bunch of problems away, and it is actually quite fun when the information comes to me instead me going to it.
Now I have automated checking my bank account and credit card balance, updating dynamic IP of server, ebook sales numbers, and network clock synchronizing. There are some general ideas that I summarize, then give an intro to all of those scripts.

Tools
Most of my scripts are written in bash, because it’s relatively straightforward to hammer out simple stuff, and it is surprisingly simple to do a lot of things once I have thought enough about a problem. The Advanced Bash-Scripting Guide is always on my reading list, but I usually get to check only the parts that are relevant to the given problem. You can get quite far with a few simple constructs.
The most common parts I seem to come across:
- if-then-else constructs: if [ -f ‘directory ‘]; then echo “Found!”; fi
- for loops: for f in *.png; do optipng $f; done
- loading the results of a command into a variable: VAR=$(command)
For most other problems with a little keyword-fu there’s always an answer on StackOverflow or on the web.
Another group of scripts uses Python, when a bit more data-manipulation is needed, like web scraping or JSON parsing. Actually, all of the scripts could be rewritten in Python for consistency, and it would probably be be simpler too, which is something for the future.
As a general tip, most of these scripts need tweaking, and all of them are sort of alpha-beta quality code. To facilitate hacking and reduce heartache of mangled clever code, I keep everything in git repos. I share those repos online, so have to make sure there are no secrets checked in, ever. It helps to strategically use .gitignore, separate files for the secrets, and having an example how that secrets file should look in the inside.
Most of these scripts are run periodically by cron, so it is worth having some basic knowledge about how to schedule it.
Some scripts send me emails under specific circumstances (some after every run, some when new information appears), and for good delivery I have set up postfix to use Gmail as an SMTP relay. This way I’m sure to receive the emails and receive them quickly.
Scripts
These are the scripts I use most often and the longest. Still, many of them are under development and adjust them whenever I learn how to do things better. I list the links to all their repos, where it can be improved.
Banking account balances
My two main bank accounts are queried once a day for available balance and I’m notified by email. Both accounts needed quite a bit of web scraping (and got them done at two different OpenHack Taipei events). The banks’ websites are pretty awfully organized (iframes within iframes within iframes; not using CSS classes and id), though it doesn’t have to be good for me, it has to be good for the bank.
Cathay United Bank
The cathaycheck (click for repo) script queries the available balance at Cathay United Bank by logging in with curl, and parsing the final page with Beautiful Soup. The script can be a skeleton for any other website where on has to log in and then navigate over a series of pages to get the information. The required HTML variable names can be extracted with the help of the Inspect Element tools in Chrome.
At the moment the credentials is stored in the crontab command, which is not really ideal, should rewrite to use a secrets file, though given that it runs on a server where I’m the only user (and root), for me there’s no practical difference at the moment. I have set it up to receive an email at the end of the day with the current balance.
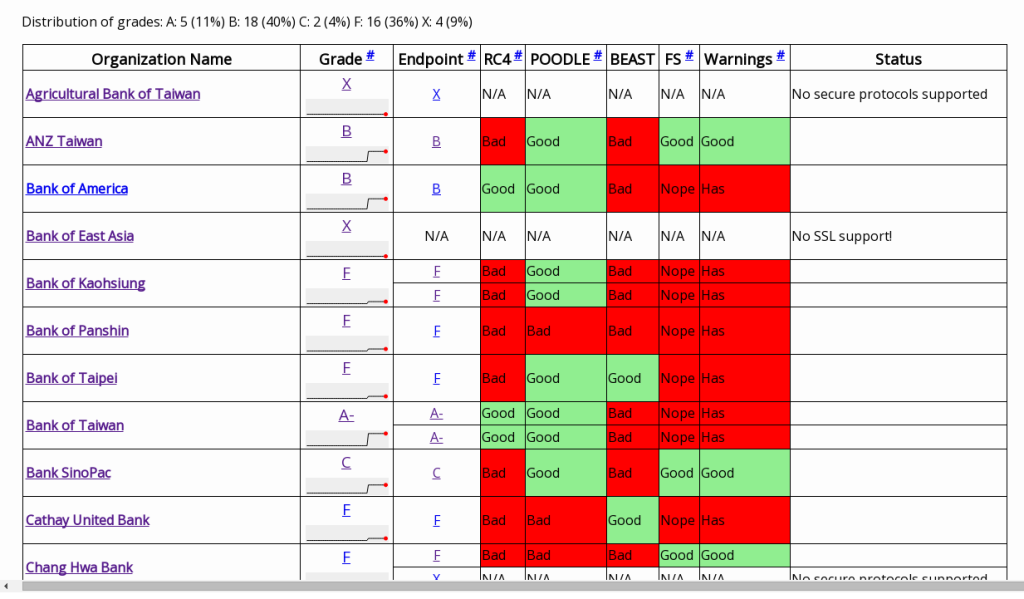
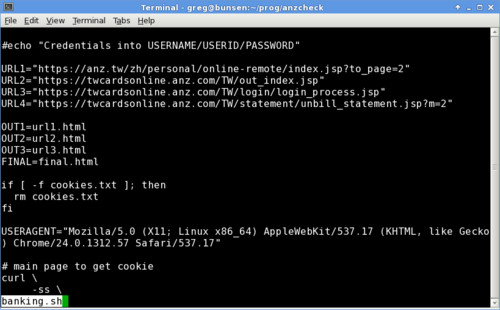
ANZ Taiwan credit card
The anzcheck (click for repo) script queries my spending with the ANZ Taiwan credit card. Again bash for logging in and Beautiful Soup for parsing the final page. It needs a bit more logic extracting information from a table, because the websites developers added no classes or ids to the items to make it easier to understand – or for them to style, but that’s not my problem.
Just recently updated that it extracts the spending items added to my balance on a given day, so I can will never be caught by surprise again (hopefully). Since many of my charges go to companies that have Chinese names, I quickly run into the problem of having to tell my Heirloom Mailx (that I use to send emails on my ArchLinux box) that the text I want to mail is plain text, not an attachment. With some hacking the solution was to add a few more commands to “mail” so it knows that the text is UTF-8. From “sendthatmail.sh” in the repo, the parameters needed are:
-S sendcharsets=utf-8 -S ttycharset=utf-8 -S encoding=8bit
I could still extract some more information from the bank’s website, though nothing really urgent.
No-IP address updater
At the Taipei Hackerspace we have a handful of servers running, but the residential internet connection is provided by Chunghwa Telecom only gives us a dynamic IP address. Applying for a static IP seems to be pretty troublesome, so in the meantime I’m using a script on one of the servers to update the IP address associated with our dynamic tpehack.no-ip.biz address.
The no-ip-bash-updater (click for repo) script is forked originally from elsewhere, but I have rewritten it quite a bit so that it
- needs no extra file to store the current IP address, but compares external IP with a DNS query
- stores no secrets in the file
It uses a pretty straightforward API call with HTTP authentication, the only real logic in there is to check when that call actually needs to be made.
E-book sales
Recently I have helped a friend to publish an ebook version of How to Start a Business in Taiwan on Leanpub, and of course I want to know when there are any sales are made (disclaimer: I don’t get a cut of the sales, all goes to the author). The leanpubsales (click for repo) script is written in Python, because using JSON there is easier than it would be with bash. The call otherwise is quite simple, just keep an external file around to check if the sales number have increased or not, if yes then send an email. To send an email conditional on the output the the script the “ifne” command from moreutils is very useful (meaning: “if input is not empty”).
The query is run periodically, and lovely to receive the results. I will surely set up a script when I get my own book ideas published on Leanpub.
RTC correction
As a physicist in atomic physics, which is the area of science very much concerned about keeping precise time, keep all my servers’ times synchronized with network time protocol (NTP) using chrony. One difficulty is that the real-time clock (RTC) of those computers is pretty crappy and drifts away. Wouldn’t be a problem if I never restart them, but a pain if I do: after restart it can be tens of seconds away until the time is synchronized again.
Chrony can sync NTP and the RTC, but it doesn’t do that automatically, I have to trigger it manually. Instead I have written up an rtccorrect (click for repo) script that is run every 2 hours or so (could be done just once a day, actually), and eliminates the drift of the RTC.
Server backup
For backing up data between servers rsync has proven invaluable. I have a couple of scripts that do just that, though those are among my oldest ones and at that time I haven’t separated out personal information (way too easy to inline every credential, email, login, and all that), so I need to sanitize that. A couple of ideas about these backup scripts:
- sometimes higher transfer speed can be achieved by messing with the ssh algorithms, eg. passing “-e ‘ssh -c arcfour'” to rsync
- more often there’s even better performance when there’s an rsync daemon running on the remote computer (though with Raspberry Pi, both cases are still frustratingly slow)
- can exclude some files if no need to transfer them, eg: “–filter=’- *.part'”
- using rsync not just to transfer but to mirror, the “–delete” (delete at target if doesn’t exist at origin) and “–archive” are pretty useful
For these backups I also use the Dead Man’s Snitch to know when things didn’t work out, e.g having a similar command in the cron list, where backup.sh is my script’s name, xxxxxxxx is the snitch ID from my account:
backup.sh && curl -s https://nosnch.in/xxxxxxx > /dev/null
This way I got to know when my backup server was dying all the time because of bad heatsink, or my host server by flaky hosting company….
Afterword
I guess there will be just more automation in the future, and maybe many of these scripts can be ported onto a common base so new ones are made much easier. What else do you guys automate?