Categories
Maker Programming

Electronic check-in at the Taipei Hackerspace

One issue we have frequently at the Taipei Hackerspace is that people don’t know when we are open. Our  basic rule is simple: whenever a keyholder member is in the Hackerspace, anyone/everyone can come. In practice people never really know if anyone’s there.

They could give a call to the space, or even send an email to the mailing list, while the people I know usually end up asking me directly – hey, anyone’s at the space at the moment? Since I don’t always know the answer, the search was on for a better – maybe more technological or hackish solution: let’s build an electronic check-in/out system that will show the current status on out website, so people can check right there.

I had the following idea in the back of my mind for a few weeks and even got the hardware acquired, but one of our co-founder had to call me out by name on the mailing list, a few days ago to swing into action. So now here it is, kinda working, ready for real usage.

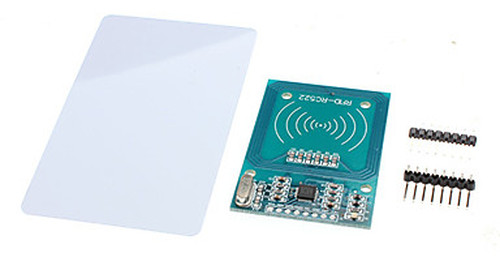
The main idea is that in Taipei pretty much everyone has an EasyCard, an 13.56MHz RFID card that is used for all public transport in the city and a lot more. The RC522 card-antenna module seems to be able to read the card pretty well, and all I need to get off it is the the ID number which is pretty straightforward (after digging the Arduino forums for source code).

The project in a nutshell is:

  • Use Arduino Mega with an RC522 board to get the ID number of a given EasyCard
  • Use witches to get whether the person is checking in or out
  • Use LEDs to provide some feedback and basic user interface for the hardware
  • Node.js server to communicate with the Arduino, interface the check-in/out database, and provide API and realtime access to the data
  • Create a bit of interface on the website to display the check-in status

Now let me dig into the different parts in detail.

RFID

The RC522 module has 8 pins, and Arduino can use the SPI library to communicate with it. I used Arduino Mega ADK, because the SPI pins are conveniently accessible, unlike e.g. the Leonardo, for which I would have had to make some new cables or headers. The RC522(pin number)->Mega(pin number) connections are done such that:

  • SA(1) -> SS(53)
  • SCK(2) -> SCK(52)
  • MOSI(3) -> MOSI(51)
  • MISO(4) -> MISO(50)
  • (5) not connected
  • GND(6) -> GND
  • RST(8) -> (any digital pin)
  • +3.3V(8) -> +3.3V
Photo of the electronics
RFID-RC522, with blank card and pins

The source code to talk to the card is from a blog, and originally from a tech shop in China, I guess (based on the big bunch of Simplified Chinese comments).

Switches and Visual Feedback

I wanted to make as simple interface for the card reader as possible. Added this pair of switches and LEDs (the D1 being green, and D2 being red). After the Arduino received a card ID from the reader, the LEDs are blinked to prompt people to press either the Check In or Check Out buttons. If they press either of them, the corresponding LED is blinked very brightly for a bit, and the card ID and check-in/out event is sent to the connected computer via serial connection
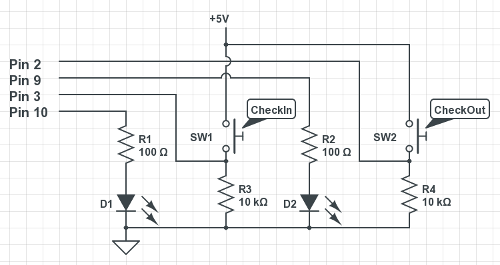
The (very basic) circuit for the check-in/out buttons and visual feedback LEDs
The (very basic) circuit for the check-in/out buttons and visual feedback LEDs. “Pins” refer to the Arduino pins used in the current version

If no button press occurs within 10 seconds or so, the reading is discarded and the card reader goes back to listening mode.

Webserver

Node.js is very useful to make quick web services, and its library support is not too bad at all, although it’s not all smooth sailing: their documentation is often scarce at best. Nevertheless it was the fastest one to get things up and running, since I have used before almost all required components.

The server communicates with Arduino via the serialport library. I’m more used to Python’s pyserial, though in this case it was very handy that serialport can emit read events, thus the server can just wait until there’s something to read and run some functions on the incoming data. In my experience, serialport wouldn’t be good for every cornercase I came across in serial-land, but in this setup works beautifully.

I chose SQLite3 to store the data, using the sqlite3 library. There are a bunch of others, had to look around which one is still being developed. This particular library is not too bad, though I found myself fighting the lack of documentation and asynchronicity quite a bit. The resulting code is pretty ugly I’m sure, in some places inefficient because I didn’t know how to get to the result I wanted in a less roundabout way, still it seems to work and that is what matters for a prototype.

First I made a simple REST API to query the currently checked-in people, and later added (real-time) push updates via socket.io, to make it nicer. It’s brilliant that without any polling, all clients can be updated once someone signs in or out.

Since this code is running on a different computer than our main web server, had to play around with the Access-Control-Allow-Origin header, and adjusting the settings of our  router to make it accessible for the web correctly.

Tried to add a pretty-much self-contained script that the front-end can load, and it handles everything, just need an appropriate HTML span or div element to display the information.
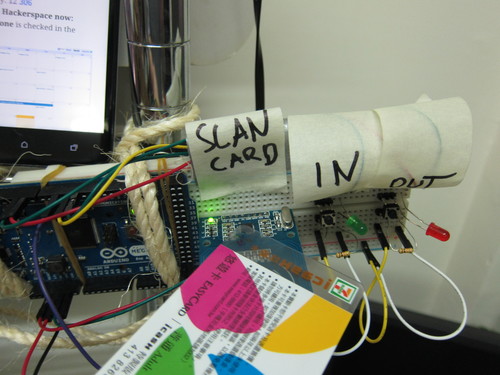
Photo showing the circuit used for the check-in system
Hardware setup for checking in/out: Arduino Mega, RFID-RC522 circuit, and some switches and LEDs.

The result is pretty good, as long as the card-reader does not crash. Originally the results were displayed in a table, but wanted to make it more human, so here’s the format I ended up with:

Website screenshot showing two people checked in
Screenshot of the homepage with one particular check-in situation.

There can also be people with no name, they just show up something like “Right now there are three people checked in the Hackerspace: Greg, and two other people.”

It lives!

Here’s a quick demonstration video of how does it work:

So you can check out our website at http://tpehack.no-ip.biz/ for the live results, and drop in if you are in the neighbourhood if there’s anyone in the ‘space.

The whole source code is shared in a Github repository: the Arduino sketch, the server script, and any additional files. I’m sure there are a lot of things that could be improved about it.
Categories
Admin Lab Programming

Laboratory 2.0 – a monitoring system

Looks like that one of my specialty as a physicist, and contribution to the labs where I have worked so far, is bringing different kinds of programming techniques, and technologies to the table. I’m not saying I’m any better than many of the professors, post-docs, and students I’ve met so far (there are plenty of ingenious ones), it’s more like I experiment with different tools, have tried more of the cutting edge or recent technologies, did some web programming and could whip up something quick – that might not work very well at first, but does broaden the horizon for the rest of the people.

Also, I’m a lazy person, so want to automate as much as possible. That was on my mind recently when we have been preparing to do a vacuum-system bake-out. It’s essentially a procedure to have a delicate experimental system, mostly made up of steel, glass, and stuff like that, closed up from the atmosphere, all the air pumped out, then heated up to high temperature (~150-300°C). One has to be careful, because things can break, there are temperature limitations for some materials, also on how quickly that temperature can change, requiring careful monitoring of the status of the system. And the whole thing takes something like two weeks or more. Perfect setting for automation.

Set up the electronics

The pressure measurements are done by some expensive other equipment so didn’t have to bother with that one yet, so set to work first on the temperature monitoring. Before it was a bunch of thermocouples and multimeters, requiring manual intervention and lots of labour. Instead, got some inspiration from Adafruit’s Thermocouple Breakout Board, using the MAX31855 chip, and also from the Thermocouple Multiplexer Shield. It can handle only one channel, but can use some other chip together with it to switch between the different thermocouples, and so we can read it out one-by-one. The Adafruit board could only handle 1 channel, and the multiplexer shield was using an older chip for the measurement that I could not buy anymore. In the end, found a good analog multiplexer that one that is sold in the computer market here in Taipei, the CD4067B, and it works pretty well.

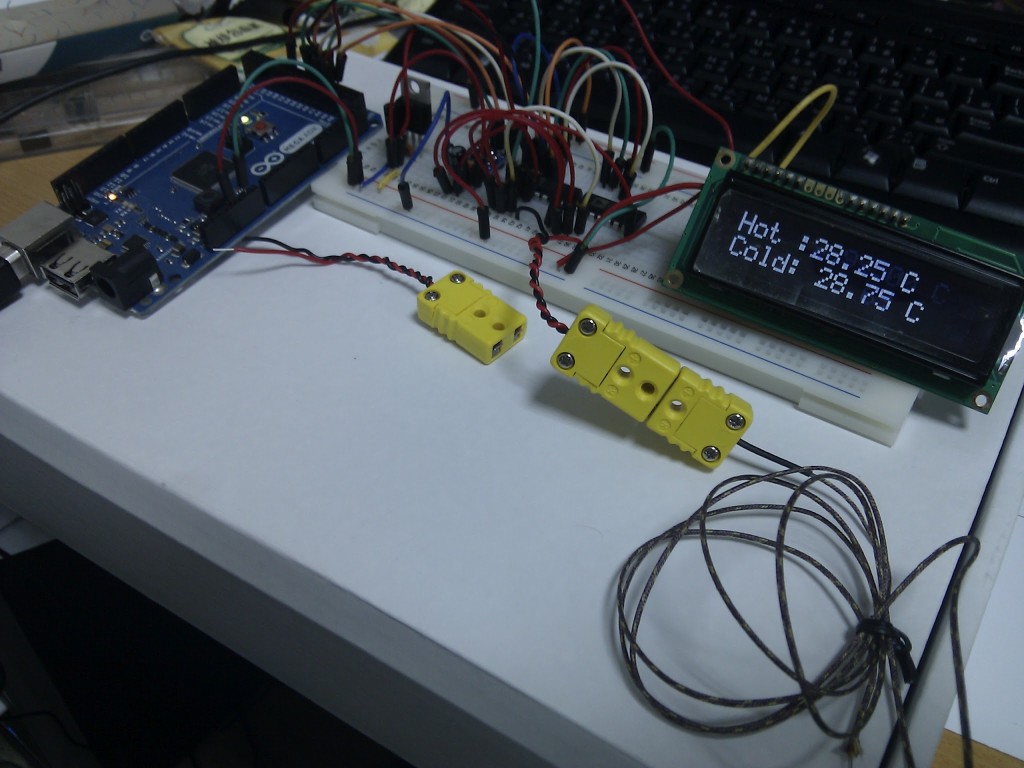
Breadboard setup for temperature monitoring Arduino
Breadboard setup for temperature monitoring with Arduino

Of course, setting it all up was quite a bit of fun times, as there were way too many gotchas along the way.

  • MAX31855 is a surface-mount component, and haven’t worked with it before. Not too bad, and can be much neater, just takes some plactice
  • MAX31855 is a 3.3V circuit, so the CMOS voltage levels used by my Arduino Mega ADK had to be level shifted
  • Unlike the older chip, MAX31855 really needs differential input, and it’s much more sensitive to the environment. This required different kind of analog multiplexer than that board had
  • The Arduino Mega is a new model for me, and had some strange behaviour in terms of the serial communication
  • Surprisingly there are not too many options for 3.3V voltage regulators over here, just the LM1117, which is different from what others are using elsewhere
  • Lots of noise and stability issues until figured out what should be how. For example under no circumstance should touch the thermocouple to conducting surfaces, and avoid ground loops
  • While MAX31855 says it’s “cold-point compensated”, meaning that it accounts for the chip-s local temperature when measuring the thermocouple, it doesn’t appear completely compensated, meaning that we can have unexpected measurement change because the chip is heating up for example by being in a closed box.
  • Figuring out the right amount of time to wait between switching channels (375ms seems to be good enough, 500ms is totally fine)
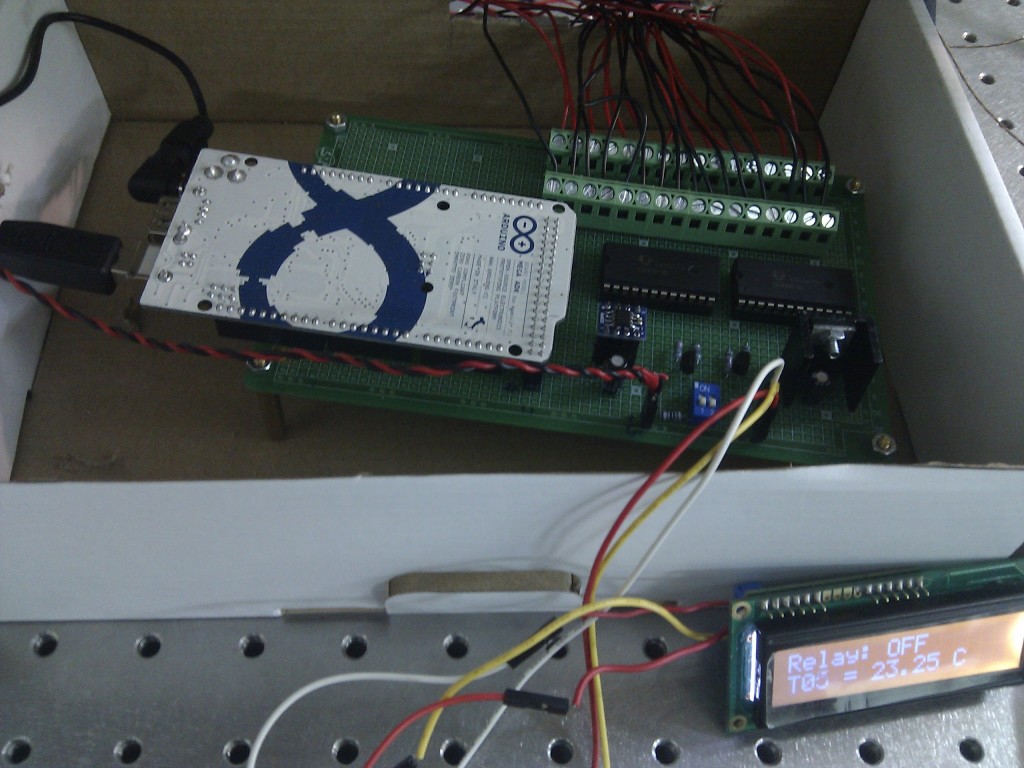
In the end, though, we did have a nice 16 channel thermocouple multiplexer, sending off the measurements onto an LCD screen and to the computer over an USB cable.
Temperature monitoring board soldered
Temperature monitoring board in it’s lab setting with 16 thermocouple channels

This is then saved in a database, and can be accessed from elsewhere.

Visualize!

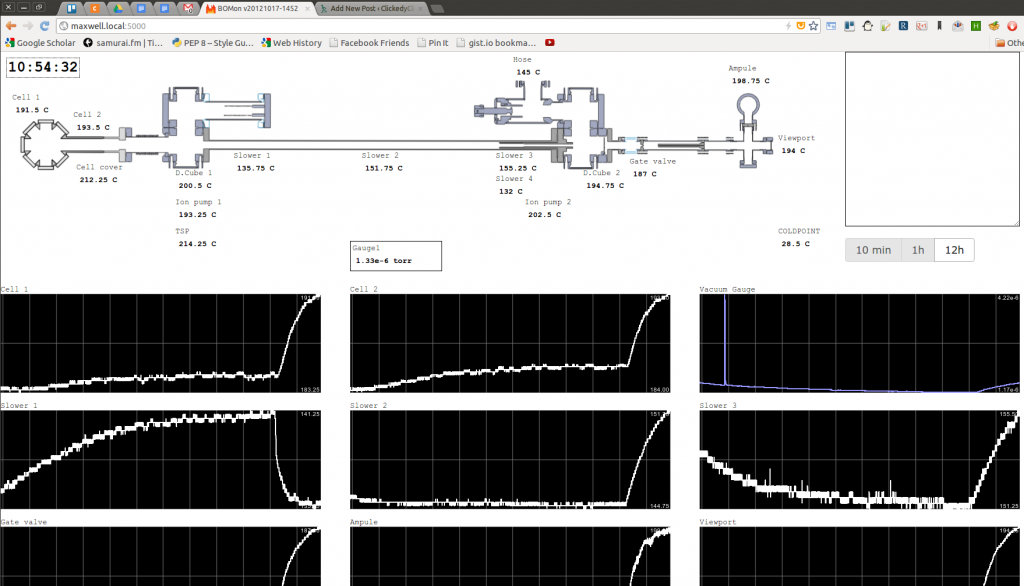
The thing that my co-workers were most amazed by wasn’t the electronics. Sure, they haven’t worked with Arduinos, but did do similar stuff. Instead they liked the monitoring interface much more, this is the one on the picture right here (can click to enlarge)

Bakeout Monitor  interface showing the vacuum system, temperatures, pressures and long term graphs
Bakeout Monitor interface (click image for full view)

It’s the schematic layout of our equipment, with the temperatures positioned where the actual sensors are. Also, the change of the measured values in time are also displayed with live scrolling.

I’m not saying it’s great. Thinking about it, the major insight that made it good for the rest of the people is that I realized how much more people understand visual data: the placement of the values to the corresponding locations on the schematics. That’s the only thing.

So inside it’s a MongoDB database (learned from previous mistakes, using a replica-set at least), with Python scripts talking to the sensors and saving the data, NodeJS / Smoothie Charts for visualization (and plain old CSS positioning of <input> tags for the reading display), nginx‘s upstream module for running two monitoring servers just in case. It’s mostly in the Github repo of the monitoring code, as well as the Arduino sketch for talking to the electronics.

It was actually quite fun to write it all, and the gradual improvements, trying the new tech, trying not to lose to much data, amazed how well it works. Especially had a good time learning about the database, scaling, fault tolerance, performance…

Of course there could be room for a lot more improvements.

  • My failover-restart bash scripts are awful, though they do seem to work more or less and counteract the USB unreliablilities
  • There were some changes to Smoothie Charts that I could improve on: logarithmic plotting, some display enhancements, wonder if it can be more optimized for performance
  • More efficient data loading. 12h data is about 30Mb in JSON format, that I send compressed, apparently it gets down to ~5% in size, but it still takes quite a bit of time to process on the frontend
  • The layout now can be changed from config files if the sensors change, so co-workers can do that without programming knowledge. I wonder if that can be simplified even more

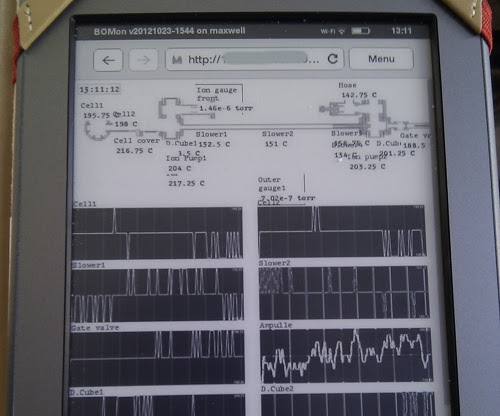
Of course, I’m a person who generally overengineers stuff, so maybe it’s good to stop somewhere. And the somewhere might be when I got to the point to use my Kindle for monitoring (craps out on 1h data already, but some real time things are good enough).

Bakeout Monitor interface running on Kindle
Bakeout Monitor on running on Kindle 3, not perfect but does work

Get on with it

I did learn a lot along the way, and I’m sure that with this experience I will be let to do a little bit more in the lab in terms of programming ideas. I don’t like that the rest of the system is currently forced to be LabView, but that’s for another post, and there are so many things that can be improved in general as well. Let’s just go and do that.

Categories
Programming

Frindcare, some improvements

After getting to a working level with Friendcare, my web app to track friending and defriending on Facebook, I was still doing some tweaks. Some of the tweaks is to improve functionality, some of them to fix some broken behaviour by the services I use (especially Facebook). This is a little summary of what I have learned in this short time.

Changes

Heroku

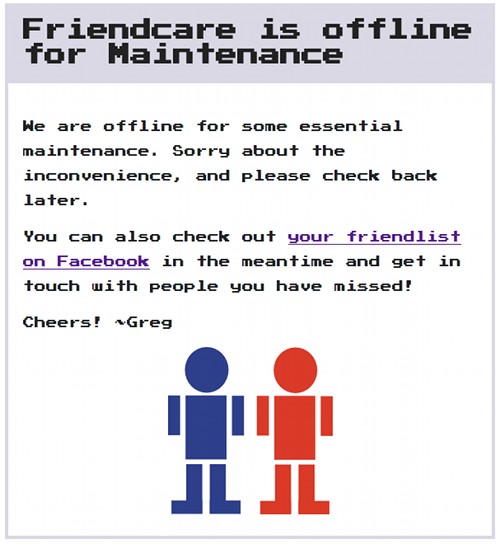
The very day of my last blogpost, when I actually had others sign up as well, Heroku had a few hour long outage. That was quite unfortunate, and it was annoying to see the “Application Error” page, which pretty much hides what really happened. In real production environment probably I would have to run things on multiple independent platforms so if the platform itself is the one that crashes, the site could be just switched over. This time I’m just taking it simple, make a personalized maintenance page, which I can turn on in this case, or when I’ll really need some maintenance time. Also, played around Google Web Fonts, so can have the good old school Press Start 2P on this one.

Friendcare is offline for maintenance
Friendcare maintenance screen

It would be nice if in case of trouble I could use a web interface to trigger maintenance mode. Might build a service for that, though now that I think of it, that will have to be hosted outside of Heroku. Also, later might do an application error page as well, just in case. Might even choose a mascot for that. Though probably not.

Fonts

Besides the error page, I was playing around with other fonts for the main interface as well. In the end the current one is Crimson Text, which should be quite readable even with very different font size. It is mostly good, though it doesn’t play completely well with Twitter Bootstrap, the button texts for example are not totally well aligned vertically. Might have to look around the fonts a little bit more.

Friendcare header layout
Tweaked layout, and it actually already has results

Facebook

Facebook has so many weird things going on, that I can barely wrap my head around it. One of my impression, which probably shouldn’t surprise me, that they are most likely not using their own APIs, otherwise it wouldn’t have such huge bugs in it. Another impression is, that somehow they manage make everything almost good, but in some way completely bad.

Graph API reliability

Since the entire site relies on regularly polling the user’s friend list, getting that list consistently is a must. Somehow the Graph API occasionally misses some friends: they don’t appear in the list and I mistakenly assume as lost connections. An hour later, when polling again they are back in the list, so they show up as friendship gain. That doesn’t work very well. This happens a lot, so I had some algorithms in place for that and sometimes had to manually clean up the database (which I really shouldn’t do if it can be avoided).

FQL

I can also use the Facebook Query Language to get the information I want. It is quite straightforward, they even have the expression among their examples:

SELECT uid2 FROM friend WHERE uid1=me()

This is pretty fast as well, maybe half the time of the Graph API request. There’s one problem, though: it returns wrong results. Not entirely wrong, just wrong enough. The list I receive seem to have a bunch of invalid user IDs, such that it doesn’t belong to anyone. They just don’t exists, but I still receive them. So while Graph API suffered from false negatives, FQL suffers from false positives. Fortunately there seems to be a workaround, in the form of a deeper query such that

SELECT name, uid FROM user WHERE uid in (SELECT uid2 FROM friend WHERE uid1=me())

Here I will actually throw away the ‘name’ part, but at least I know that the IDs that I receive do belong to actual people. So far this seems to be the most reliable, though it takes as much time as the Graph API request, or maybe a bit more.

In the end, currently I query both the Graph and FQL in sequence, compare the results, note if they differ (for debugging purposes) and use the FQL result since that seems to be more reliable. Will check back later to this part, when I have more information to go on.

Offline access

Offline access is pretty important for this kind of service, because it’s not that useful if we can only check the results when the user comes to the page. Unfortunately, the ‘offline_access’ permission has just been removed. Instead the access token lives for 60 days, after which one has to get a new one by logging the user in again. I’m not saying it’s unreasonable, maybe even better since I don’t have to ask for any extended permission over the ones that are granted to every app automatically, but have to keep in mind. It might complicate things. Also reminds me that other apps that I’m using with Facebook (e.g. ifttt) will have some problem because of this thus I will have problem with this. Better check with them.

Send message prompt dialog

I kinda understood when they have removed the ability to send message to others on the user’s behalf without their interaction, that’s such a tempting spam delivery system for most, I presume. On the other hand, for a long time at least they had (or I seem to remember they had) a send dialog, where I could prompt a user to send a message to someone else: they write the actual message and they click send. On the other hand, the current Send Dialog has a required parameter ‘link’, this it is no longer possible to send “just a message”. This must be a relatively new chance, since the dialog’s page describes it as:

The Send Dialog lets people to send content to specific friends.

Fair enough, that’s exactly how does it work. On the other hand, just one level up, the Dialogs Overview says this:

The Send Dialog allows a user to send a Facebook Message to one or more of their friends.

Content vs. message, subtle but crucial difference. Thus in my app I cannot have a “send message to this user” button, unless I attach some kind of link to the message. Now this feels really spammy to me.

Overall

It is good to add a few more features, because I can use it better as well, and I learned a lot too. Might add a proper dashboard, a deregister option, notification to email or (if I can figure out how) Facebook message, stats, better layout. Or whatever suggestion I receive.

Finally, the most important thing that it works. In the last week I found two people who defriended me for whatever reason, and I wouldn’t have known about otherwise. They were not close ones, so not going to pursue them, but it could have been otherwise, so at least it’s good to know.

Categories
Programming

Friendcare, satisfying a curiosity

Quite often I find services I’m using inadequate. Something is missing, or not working the way I hope, I wish it could be changed. In a fraction of the cases it can actually be changed, and an even smaller fraction I go and change it myself.

This time it was bugging me that while I am always aware if I have new contact established on Facebook (or colloquially “friended someone”), but there’s just no way to know if someone cut ties (“defriended”) me. In some ways that knowledge is just as important, since the first means I succeeded in being interesting to another person in some way, the second means I was actually annoyance – not just being ignored and never talked to but people took the effort to never hear about me again. Recently quite a few people did that to me, or at least it’s only now that I try to find them for this or that but I can’t. I never want to be caught off-guard like this again, so I made Friendcare.

Friendcare interfacing

It was mostly an exercise in web app building, since if it was only for me, I could have just set up a script on my server that monitors things. It’s more fun as well. First I started it a long time ago, tried to work on it and rewrote from scratch a couple of times until getting here.

What does it do?

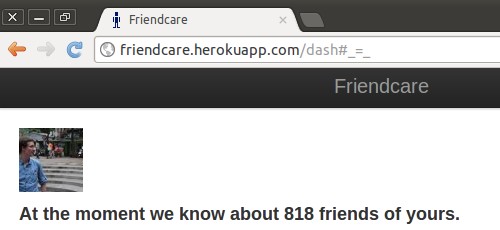
In this one the site just gets the user’s friendlist (a list of IDs) from Facebook and compares it with the last known friendlist. If there are new IDs, they are considered friend gains, if there are missing ones, those are friend losses.

Actually it got pretty complicated logic (for my usual thinking) inside because of the asynchronous management of good NodeJS apps, had to think a lot about what information is available at what step and what time of the usage. It also didn’t help that I haven’t really planed the user experience (UX) first, just started to code. Some of the things are surely pretty terribly done because of premature optimization and scaling I was doing while only havng a single user of the site. All in all, it’s an absolutely horrendous mess in the inside that still seems to implement a suitably close approximation of what I wanted. Surly will need some refractoring sooner rather than later.

The parts

It’s amazing how many different parts I need to use to make one complete site work, a total web-tech-soup. Everything is in a library or in an external service. It’s good and bad – good because other people did the heavy lifting for me already, bad because every one of them needs a non-trivial effort to learn and all of them different. Nevertheless, trying to keep things minimal. At the moment it’s NodeJS on Heroku, with MongoDB and using Heroku Scheduler to trigger the update service. The other modules and parts are:

Everyauth

Without Everyauth nothing would work, it handles the Facebook authentication on the backend. Also, it gave me ideas how the site can be extended to multiple services / multiple social networks.

Fbgraph

There are so many interfaces to talk to Facebook, and the heroku-nodejs app I started off from uses one of them as well. That just seems to be too specialized for an example app, not in functionality but in implementation. Instead I found myself another library, fbgraph, and so far so good. If I really wanted to, I could even easier interface just the Graph API, but no need to do that at the moment.

Mongoose

I choose Mongoose/MongoDB to store the associated data, well, basically because MongoLab had the largest free database offering of all the databases I have checked. So far so good. I like the schemaless database, though already run into problems when I was updating wrong fields in the dataset I was surprised that the results didn’t show up at the right place. I guess that’s a danger I can live with at the moment. Will have to learn more about it, how to back things up, how to maintain it well, and about mongoose and it’s schemas.

Underscore

The core functionality is basically taking the difference of two sets, and in general there is quite a bit of set manipulation, so Underscore works very well, I used for a couple of other parts as well (reduce, groupBy), and it works well. The whole thing feels like it should be part of the base library.

Twitter Bootstrap

While risking that I’ll look exactly the same as many others, Bootstrap does give some good-looking results with moderate effort. Will have to do some tweaking because I know so little about making good UIs, but it’s a start.

EJS

Used EJS for templating, and it’s great. Fast, flexible, and it’s not too bad that I have to fill in most of the HTML manually. I will know more about the structure of the client facing  side of the page more than I would otherwise.

Lessons learned

There are things that went well and not so well.

  • Maybe the most important: Facebook is unreliable. Sometimes I got missing people in the list that appear in the next update again. This happened when using Graph API, will have to see if FQL is any better. From my experience: not, it just has different problems.
  • For a while I started to write in Coffeescript, but then I just spent too much time trying to figure out how to get the right things, so went back to Javascript, at least until I learn that and can move up again to that higher level.
  • From the app’s point of view, some simplification needed. Too many middleware and helpers, this I quite often not sure about what is the state of my data, what variables were available and what are not.
  • Forums are not always helpful, quite often people have really dumb answers to questions, so have to figure things out myself.
  • Too many successful libraries mean that the library-soup will inevitably cause problems, and people start writing new libraries that connect and unify the old ones: mongoose & backbone, mongodb & everyauth, so much magic (ie. behind the scenes stuff) happens.
  • I still like to make logos and facicons, though I’m sure they are terrible, it makes good playtime in Inkscape and Gimp. Might have to change the colours, it does remind me of a strange toilet logo…
Friendcare logo

Aftermath

In the end, I’m solving a very narrow problem at the moment, a problem that so rarely arises, that I don’t even know if it will happen again. But if it does happen, without this I wouldn’t know about it, so still worth it.

Might extend it later to count Twitter followers, Google+ circles, Github watch/fork, whatnot… But that’s later when I see how does this work, I care much less about those than my “friends” because of the symmetricity of it .

The good thing is that currently it works well enough that I kinda got this off my chest and can back to making a FUSE module for Ge.tt, a group based location sharing mobile app, an app to connect my Goodreads to-read list and bookstore databases,  adding Open Graph and Rich Objects to Octopress, getting out an update for WatchDoc, or even check out the games I just got from HumbleBundle. But will come back to this, will have to make it better (it’s a compulsion).

Finally, if you the site, let me know your suggestions, I’m eager to learn. The source is up on Github.