Categories
Computers Machine Learning Programming

Adventures into Code Age with an LLM

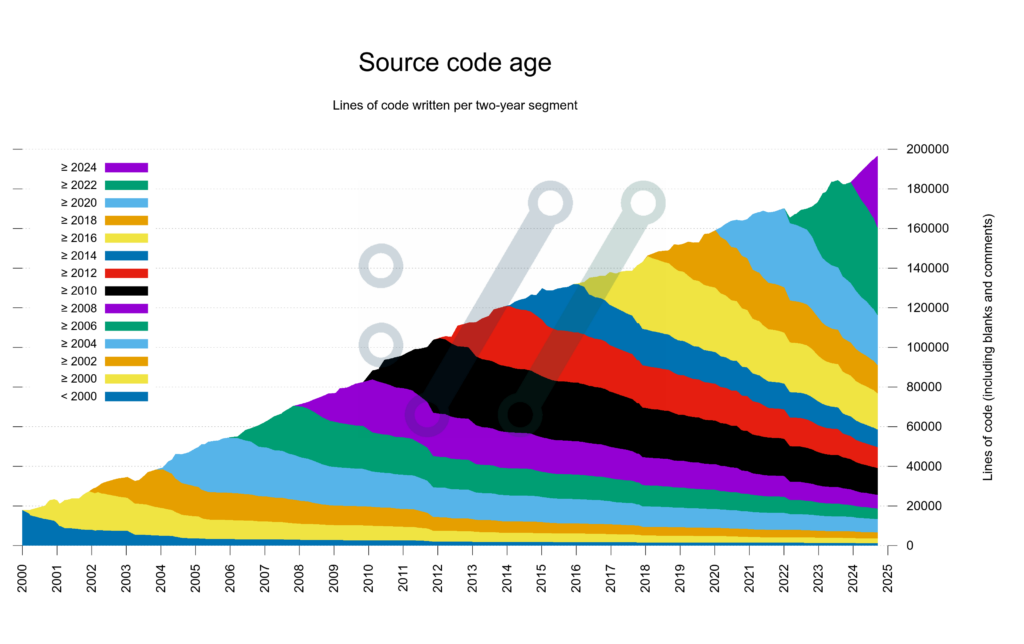
It’s a relaxed Saturday afternoon, and I just remembered some nerdy plots I’ve seen online for various projects, depicting “code age” over time: how does your repository change over the months and years, how much code still survives from the beginning till now, etc… Something like this made by the author of curl:

Curl’s code age distribution

It looks interesting and informative. And even though I don’t have codebases that have been around this long, there are plenty of codebases around me that are fast moving, so something like a month (or in some cases week) level cohorts could be interesting.

One way to take this challenge on is to actually sit down and write the code. Another is to take a Large Language Model, say Claude and try to get that to make it. Of course the challenge is different in nature. For this case, let’s put myself in the shoes of someone who says

I am more interested in the results than the process, and want to get to the results quicker.

See how far we can get with this attitude, and where does it break down (probably no spoiler: it breaks down very quickly.).

Note on the selection of the model: I’ve chosen Claude just because generally I have good experience with it these days, and it can share generated artefacts (like the relevant Python code) which is nice. And it’s a short afternoon. :) Otherwise anything else could work as well, though surely with varying results.

Version 1

Let’s kick it off with a quick prompt.

Prompt: How would you generate a chart from a git repository to show the age of the code? That is when the code was written and how much of it survives over time?

Claude quickly picked it up and made me a Python script, which is nice (that being my day-to-day programming language). I guess that’s generally a good assumption these days if one does data analytics anyways (asking for another language is left for another experiment).

The result is this this code. I’ve skimmed it that it doesn’t just delete all my repo or does something completely batshit, but otherwise saved in a repo that I have at hand. To make it easier on myself, added some inline metadata with the dependencies:

# /// script
# dependencies = [
#   "pandas",
#   "matplotlib",
# ]
# ///

and from there I can just run the script with uv.

First it checked too few files (my repository is a mixture of Python and SQL scripts managed by dbt), so had to go in and change those filters, expanding them.

Then the thought struck me to remove the filter altogether (since it already checks only files that are checked in git, so it should be fine – but then it broke on a step where it reads a file as if it was text to find the line counts. I guess there could be a better way of filtering (say “do not read binary files”, if there’s a way to do that), but just went with catching the problems:

# ....
    for file_path in tracked_files:
        try:
            timestamps = get_file_blame_data(file_path)
            for timestamp in timestamps:
                blame_data[timestamp] += 1
                total_lines += 1
        except UnicodeDecodeError:
            print(f"Error reading file: {file_path}")
            continue
#....

(hance I know that a favicon PNG was causting those UnicodeDecodeError hubbub in earlier runs. Now we are getting somewhere, and we have a graph like this:

Version 1

This is already quite fun to see. There are the sudden accelerations of development, there are the plateaus of me working on other projects, and generally feel like “wow, productive!” (with no facts backing that feeling 😂). Also pretty good ROI on maybe 15 mins of effort.

Having said that, this is still fair from what I wanted.

Version 2

Promt: Could we change the code to have cohorts of time, that is configurable, say monthly, or yearly cohoorts, and colour the chart to see how long each cohort survives?

This came back with another set of code. Adding the metadata, skimming it (it has the filter on the file extensions again, never mind), and running it once more to see the output, I get this:

Version 2

Because of the file extension filter in place, the numbers are obviously not aligning with the above, but it does something. The something is a bit unclear, bit it feels like progress, so let’s give it a benefit of the doubt, and just change once more.

Version 3

Promt: Now change this into a cummulative graph, please.

One more time Claude came back with this code. Adding the metadata again, same drill. Running this has failed with errors in numpy, though:

TypeError: ufunc 'isfinite' not supported for the input types, and the inputs could not be safely coerced to any supported types according to the casting rule ''safe''

Now this needed some debugging. It turns out a column the code is trying to plot is actually numbers as strings rather than numbers as, you know, say floats…

# my "fix"
        df['cumulative_percentage'] = df['cumulative_percentage'].astype(float)
# end

        # Plot cumulative area
        plt.fill_between(df.index, df['cumulative_percentage'],
                        alpha=0.6, color='royalblue',
                        label='Cumulative Code')

It didn’t take too many tries, but it was confusing at first – why shouldn’t be, if I didn’t actually read just skim the code…

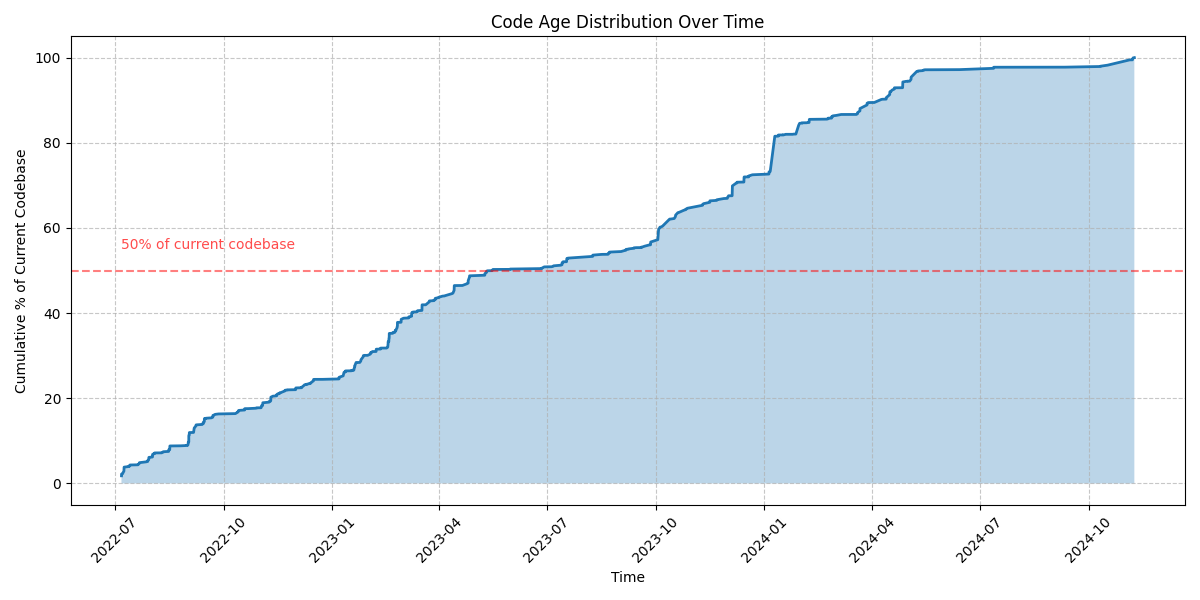
The result is then like this:

Version 3

Sort of meh, it feels like it’s not going to the right direction overall.

But while debugging the above issues, I first tried tried to ask Claude about the error (maybe it can fix it itself), but came back with “Your message exceeds the length limit. …” (for free users, that is). So I kinda stopped here for the time being.

Lessons learned

The first lesson is very much re-learned:

Garbage in, garbage out.

If I cannot express what I really want, it’s very difficult to make it happen. And my prompts were by no means expressing my wishes correctly, no wonder Claude wasn’t really hitting the mark. Whether or not a human engineer would have faired better, I don’t know. I know however, that this kind of “tell me exceedingly clearly what’s your idea” is an everyday conversation for me as an engineer (and being on both end of the convo).

The code provided by the model wasn’t really far off for some solution, so that was fun! On the other hand, when it hit any issues, I really had to have domain and language knowledge to fix things. This seems like an interesting place to be:

  • the results are quick and on the surface good-enough for a non/less technical person, probably
  • but they would also be the ones who couldn’t do anything if something goes wrong.

Even myself I feel that it would be hard to support the code as a software engineer if it was just generated like this. But that’s also a strange thought: so many times I have to support (debug, extend, explain, refactor) code that I haven’t had anything to do with before.

It seems to me that now that since Claude comes across as an eager junior engineer, writing decent code that always needs some adjustments, the trade-off is really in the dimension of spending time to get better at prompting vs better at coding.

If there’s a person with some amount of programming skills, mostly interested in the results not the process, and doubling down on prompting: they likely could get loads further than I did here. Good quality prompts and small amount of code adjustments being the sweet spot for them.

For others who have more programming expertise, and maybe more interested in the process, spending time on getting better at programming rather than getting really better at prompting: keeping to smaller snippets might be the sweet spot, or learning new languages, … Something as a starting point for digging in, a seed, is what this process can help with.

Future

Given the above notes on how this generated code is like a new codebase that I suddenly neet to support, here’s a different, fun exercise 💡 to actually improve engineering skills:

Take AI generated code that is “good enough” for a small problem and refactor, extent, productionise it.

I’m not sure if this would work, or would get me into wrong habits, but if I wanted do have some quick ways of doing deliberate practice – and not Exercism, LeetCode, or somilar, rather something that can be custom made, then this seems a way to get started.

Also, now that I’ve gotten even more interested in the problem, I’ll likely just dig into how to actually define that chart I was looking for and what kind of data I would need to get from git to make it happen. The example code made me pretty confident, that “all I need is Python” really, even though while prepping for this I found other useful tools like one allowing you to write SQL queries for your repo, that might be some further way to expand my understanding.

Either way, it’s just fun to mess with code on a lazy Saturday.

Categories
Computers

Git login and commit signing with security

Doing software engineering (well-ish) is pretty hard to imagine without working in version control, which most of the time means git. In a practical setup of git there’s the question of how do I get access to the code it stores — how do I “check things out”? — and optionally how can others verify that it was indeed me who did the changes — how do I “sign” my commits? Recently I’ve changed my mind about what’s a good combination for these two aspects, and what tools am I using to do them.

Access Options

In broad terms git repositories can be checked out either though the HTTP protocol, or through the SSH protocol. Both have pros and cons.

Having two-factor authentication (2FA) made the HTTP access more secure but also more setup (no more direct username/password usage, rather needing to create extra access keys used in place of passwords). Credentials were still in plain text (as far as I know) on the machine in some git config files.

The SSH setup was in some sense more practical one (creating keys on your own machine, and just passing in the public key portion), though there were still secrets in plain text on my machine (as I don’t think the majority of people used password-protected SSH keys, due to their user experience). This is what I’ve used for years: add a new SSH key for a new machine that I’m working on, check code out through ssh+git, and work away.

When I’ve recently came across the git-credential-manager tool that supposed to make HTTP access nicer (for various git servers and services), and get rid of plain text secrets. Of course this is not the first or only one of the tools that does git credentials, but being made by GitHub, it had some more clout. This made me re-evaulate what options do I have for SSH as well for similar security improvements.

Thus I’ve found that both 1Password and KeePassXC (the two main password managers I use) have ssh-agent integration, and thus can store SSH keys + give access to them as needed. No more plain text (or password protected) private keys on disk with these either!

Now it seems there are two good, new options to evaulate, and for the full picture I looked at how the code signing options work in this context as well.

Categories
Admin Computers

ZFS on a Raspberry Pi

I have a little home server, just like mike many other geeks / nerds / programmers / technical people… It can be both useful, a learning experience, as well as a real chore; most of the time the balance is shifting between these two ends. Today I’m taking notes here on one aspect of that home server that is widely swing between those two use cases.

When I say I have a home server, that might be too generous description of the status quo: I have a pretty banged up Raspberry Pi 3B. It’s running ArchLinux ARM, the 64-bit, AAarch64 version, looking a bit more retro on the hardware front while pushing for more modernity on the software side – a mix that I find fun.

There are a handful of services running on the device — not that many, mostly limited by it’s *gulp* 1GB memory; plenty of things I’d love to run, doesn’t well co-locate in such a tiny compartment. Besides the memory, it’s also limited by storage: the Raspberry Pi runs off an SD card, and those are both fragile, and limited in size. If one wants to run a home file server, say using a handful of other SD cards lying around, to expand the available storage, that will be awkward very soon. To make that task less awkward (or replace one kind of awkward with a more interesting one), I’ve set out to set up a ZFS storage pool, using OpenZFS.

The idea

Why ZFS? In big part, to be able to credibly answer that question.

But with a single, more concrete reason: being able to build a more solid and expandable storage unit. ZFS cancombine different storage units

  • in a way that combats data errors, e.g. mirroring: this addresses SD cards fragility
  • in a way that data can expand across all of them in a single file system: this addresses the SD cards size limitations

This sounds great in theory and after a bit of trial-and-error, I’ve made the following setup, relying on dynamic kernel modules for support for flexibility, and a hodgepodge of drives at hand for the storage

The file system supports needs is provided by the zfs-dkms package dynamic kernel module (DKMS), which means the kernel module required for being able to manage that file system is recompiled for each new Linux kernel version as it is updated. This is handy in theory, as I can use the main kernel packages provided by the ArchLinux ARM team.

For storage, I’ve started off with two SD cards in mirror mode (going for data integrity first). Later I’ve found — and invested in — some large capacity USB sticks that bumped the storage size quite a bit. With these, the currentl ZFS pool looks like this:

Terminal screenshot of the 'zpool status' command.

It already saved me — or rather my data — once where an SD card was acting up, though that’s par for the course. One very large benefit is that the main system card is being used less, so hopefully will last longer.

The complications

Of course, it’s never this easy… With non-mainline kernel modules and with DKMS, every update is a bit of a gamble, that can suddenly not pay off. That’s exactly what happened last year, when suddenly the module didn’t compile anymore on a new kernel version, and thus all that storage was sitting dump and inaccessible. After digging into the issue, it down to:

  1. the OpenZFS project being under Common Development and Distribution License (CDDL)
  2. the Linux kernel deliberately breaking non-GPL licensed code by starting to withold certain floating point capabilities, because “this is not expected to be disruptive to existing users”.

This wasn’t great, as user being between pretty much a rock & a hard place, even if this is a hobby and not strictly speaking a production use case on my side.

Nonetheless, it worked by downgrading to a working version and skipping updates to the kernel packages.

Then based on a suggestion, patching the zfs-dkms package (rewriting the license entry in the META file) to make it look like it’s a GPL-licensed module — which is fair game for one doing on their own machine. This is hacky, or let’s call it pragmatic.

--- META.prev   2024-02-28 08:42:21.526641154 +0800
+++ META        2024-02-28 08:42:36.435569959 +0800
@@ -4,7 +4,7 @@
 Version:       2.2.3
 Release:       1
 Release-Tags:  relext
-License:       CDDL
+License:       GPL
 Author:        OpenZFS
 Linux-Maximum: 6.7
 Linux-Minimum: 3.10

Now, with the current 2.2.3 version, it seems like there’s an official fix-slash-workaround for being able to get the module to compile, even if it’s not a full fix. From the linked merge request message I’m not fully convinced that this is not a fragile status quo, but it’s at least front of mind – good going for wider ARM hardware usage that brings out people’s willingness to fix things!

Future development

Some while back, while working at an IoT software deploument & management company, I had a lot of interesting hardware at hand, naturally, to build things with (or wrestle with…). Nowadays I have things I best describe as spare parts, and thus loads of thingss are more fragile than they need to be, as well as gosh-it-takes-a-long-time to compile things on a Raspberry Pi 3 – making every kernel update some half-an-hour longer!

Likely the best move would be to upgrade to a (much more powerful) Raspberry Pi 5 and use an external NVMe drive, where I’d have much less need for ZFS, at least for the original reasons. It would likely be still useful for other aspects (such as snapshotting, or sending/receiving the drive data, compression, deduplication, etc…), changing the learning path away from multi-device support to the file system features.

If I wanted to use more storage in the existing system, I could also get rid of the mirrored SD cards and just just 4 large USB sticks (maybe in a RAIDZ setup), a poor-man’s NAS, I guess. Though there I’d worry a bit about using the sticks with the same sizes for this to work (unlike pooling, which has no same-size requirements), given the differences in the supposedly same sized products from different companies (likely locking me into a having the same brand and model across the board).

I also feel like I’m not using ZFS to its full potential. If I know enough just to be dangerous… maybe that’s the generalists natural habitat?

Categories
Maker Programming

Making a USB Mute Button for Online Meetings

I use Google Meet every day for (potentially hours of) online meetings at work, so it’s very easy to notice when things change and for example new features are available. Recently I’ve found a new “Call Control” section in the settings that promised a lot of fun, connecting USB devices to control my calls.

Screenshot of the Google Meet Settings menu during calls, showing the call control menu and a call-out to connect my USB device.
Google Meet Settings menu during a call, witht the Call control section

As someone who enjoys (or drawn to, or sort-of obscessed with) hacking on hardware, this was a nice call of action: let’s cobble together a custom USB button that can do some kind of call control1: say muting myself in the call, showing mute status, hanging up, etc.

This kicked off such a deep rabbit hole that I barely made it back up to the top, but one that seeded a crazy amount of future opportunities.

Categories
Programming

Doing the Easy Problems on Leetcode

Over the last decade I seem to have been working in environments, where many engineers and engineering minded people spend time with programming puzzles and coding challenges. Let it be Advent of Code, Project Euler, Exercism, TopCoder, or Leetcode. I’ve tried all of these before (and probably a few more that I no longer remember), though with various amount of time spent all fired up, and then fizzled out. Recently I’ve picked up Leetcode, since from the above list that’s why I’ve spent the least amount of time with and others mentioned using it a way to relax and learn on weekends (suspend judgement on the wisdom of that for now).

Thus in the last two weeks I was solving problems, though not just any problems, but went in mostly for the Easy ones. These few dozen problems and short amount of time doesn’t give me a deep impression, but from past experiences I can still distill some lessons that help shaping future experiments.

The purpose of using the Easy problems is different from e.g. going all in for puzzle-solving fun, which is likely in the Hard ones. Rather than that, I think easy problems can be used for learning some new techniques, looking for common patterns, and becoming more polygot.